WEEK ONE:
NEW TO CYCLING OR RETURNING TO IT AFTER A FEW YEARS?
At Viva Velo we are experts in taking our clients on a journey from beginner to accomplished cyclist. Here is the first part of our Top Tips for New Cyclists Guide to get you cycling safely and enjoyably. We all have to start somewhere but learning what you need to know can be daunting, confusing and contradictory. I remember when, months after I started cycling with a club, I was told something incredibly basic but absolutely essential. I wondered why it had taken so long for anyone to tell me this nugget of information. All too often there is a presumption of knowledge: that everyone must already know what they need to know. However, nothing could be further from the truth and, of course, who likes to show their ignorance by asking.
So, in this series of blogs, we hope to help those of you getting on a bike either for the first time or the first time in a while. Whether you are starting to commute by bike and dipping your toes into the world of road cycling for the sheer joy of riding we hope this guide will be useful. Each week we will cover a different issue. This week we look at the anatomy of a bike, what type a bike you might want to buy and once you have it, or if you’ve pulled your old bike out of the shed, how to keep it in good working order with some basic mechanical checks. In the following weeks we’ll then cover Cycling Safely, Kit and Equipment - without breaking the bank, some Cycling Techniques and Tips along with some notes on Fitness to help you improve and go further and maybe faster.
At Viva Velo, we specialise in helping new riders develop their skills, achieve their goals and push beyond their perceived abilities. We absolutely love sharing the knowledge we have. It was one of the reasons for setting the company up in the first place, so we hope these tips will help but if you have any questions don‘t hesitate to get in touch

WHICH BIKE?
Before we start, we thought you might want some advice on which bike might best suit your needs. If you have fished an old bike out of your shed in the last few weeks you should probably skip this section and move onto our tips about bike basics and checks. If you have bought a new bike, likewise you can probably move on BUT if you are thinking about investing in a bike whether second hand or new, then this little section should be useful. We’ll run your through the basic options you have depending on your budget and needs and whether to buy second hand or new.

Should I buy new or second-hand? It depends. If you have a limited budget the second-hand market can offer some great bargains but beware where you make your purchase. Stolen bikes often appear on online auction sites so always ask for evidence of a purchase. Even if the seller does not have this, you will get an idea of how kosher the bike is from their answer to this request. As a beginner, buying a bike from your local bike shop also gives you the assurance that should something go wrong you will have somewhere to go for support. While a local bike shop will also be happy to look over your second-hand purchase the resulting bill could take the gloss off what you thought was a bargain buy!
It is impossible for us to cover every single type of bike available here but we can give you some broad pointers. Fairly obviously which bike you choose will very much depend on what you intend to use it for. Here are the main types you might consider:

Road Bike:
This bike, as its name implies, is designed to be ridden on tarmac roads although it is possible to ride them on smooth gravel paths especially if you change to slightly thicker tyres. There is a subset of this type of bike specifically designed for off-roading called, not unreasonably, a ‘gravel bike’. Cycle cross (or CX) bikes, are similar to gravel bikes and are usually used for a combination of racing/riding on and off-road. A road bike will usually have ‘drop’ handlebars with their distinctive ‘ram’s horn’ shape. These enable the rider to assume a more aerodynamic position on the bike and provide a lower centre of gravity which aids manoeuvrability (and safety) when descending. However, when riding a road bike, normally your hands will be on the top of the handlebars rather than ‘on the drops’, in a similar position to riding either a mountain or hybrid bike. If you are looking for a bike to ride on the road for leisure or commuting this type will be most likely the appropriate choice.

Mountain Bike:
There are two main types of mountain bike: those with full-suspension (on both front and rear wheels) or those - like the one above - with just suspension on the front (‘Hard Tails’). While you certainly don’t have to ride in the mountains to have fun on this type of bike we would suggest that for a beginner you will be choosing a mountain bike if you want to ride off road for 75% of your rides. This can mean canal tow paths or rougher tracks in non-urban areas. If you are looking to get out and about in the countryside in your local area away from traffic then a mountain bike is probably the type of bike for you. If you are a beginner riding reasonably groomed gravel and other tracks, a hard tail will probably be most suitable. If you then graduate to riding on more demanding technical routes you may then wish to invest in a ‘full-sus’.

Hybrid Bike:
Riding a mountain bike on tarmac roads is perfectly possible but their wide, knobbly tyres make it a little harder than riding a road bike. If you are looking to commute or ride on both road and off road you might be better looking at a hybrid bike. This type of bike, as you would guess from its name, is designed to be a bit of a ‘bike for all seasons’. A hybrid bike will come with reasonably wide tyres that should be able to cope with gentle off-road riding as well as on tarmac. If you want a bike that will get you from A to B comfortably and maybe take you on a family ride at weekends then the hybrid in one of its forms will probably serve you best.
E-BIKES:
Electric bikes are becoming increasingly popular and all the above bike types can be found with electric assistance at a variety of different prices from £500 to £12,000! For many people, who have perhaps not cycled before or for a while, an e-bike can be a great option. The electric motor gives the rider assistance when they require it, but it only multiplies the energy that the rider is actually inputting themselves. E-bikes are therefore NOT like mopeds. You have to pedal to get any advantage from the motor and this means that you can still be exercising and getting fitter while the bike helps make those hills just a little bit easier.
There are many other types of bike like the Dutch bike, cargo bike, and the traditional ‘sit-up-and-beg’ but we have highlighted the basic choices above. Choosing a bike is as personal as choosing your clothes so giving one-size-fits-all advice is impossible. If you are interested in getting more independent advice on choosing a bike feel free to email us.

BIKE BASICS - WHICH BITS GO WHERE
You have probably heard a few of the terms we have marked on the illustration above and some of them are obvious but the names for the various bits of a bike can be confusing when you first start cycling. If you’ve ever popped in to your local bike shop and asked them to look at ‘the thing with the big cogs at the front of the bike’ because it is squeaking then the following will help you look like a pro next time you visit. But never be ashamed to ask if there is something you don’t know - that is how we all learned.

BASIC MECHANICS - WHAT TO CHECK BEFORE YOU RIDE
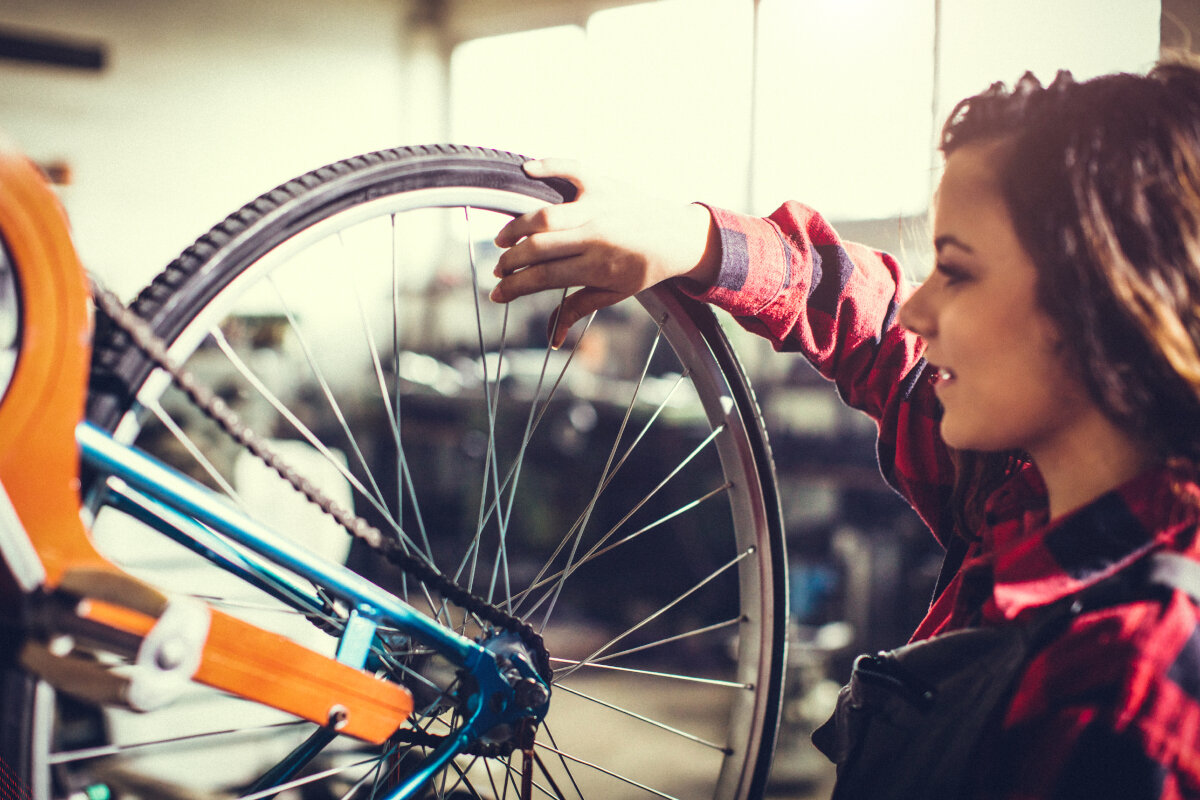
We have chosen to look at some basic mechanics first for the obvious reason that nothing is more important than a safe bike. We’ve included not just checks we would recommend you do regularly - even for a new bike - but also checks for the bike that has been dug out of the back of the garage for the first time in years.
While the areas we cover below should give you a good guide to the road-worthiness of your bike if you are in any doubt then we’d recommend you taking it to a local bike shop or call in a mobile mechanic who can come to your home or business to give your bike a once over.
Cables:
The parts most likely to need replacing on an old bike are cables. Old cables can snap and leave you stuck miles from home, so it is important you check them. Cables control brakes (unless you have a hydraulic system which you must take to a specialist to check) and gears. To check brake cables then pull the brake levers in turn. If the levers don’t immediately return when you release them the cables could be worn (frayed) and should be checked and replaced if required. Likewise, if you can test your gear levers and feel anything that feels less than crisp and immediate when changing from one gear to the next this could indicate cable wear. Although there may be other reasons for this, we’d advise getting your bike to a qualified mechanic. Riding a bike where it is hard to change gears efficiently isn’t much fun - especially if you are riding up a hill!
Wheels:
Give the wheels a spin and make sure they are true. By this we mean: are they ‘warped’? If you look at the wheel head on when you spin it and focus your attention on the wheel passing the brake pads, if the wheel is out of true, you will see lateral movement towards the brake pad as the wheel spins. If only slightly out it is still possible to ride but the brakes should be positioned a little wider apart to allow for the movement. This will make the brakes less effective and the wheel will probably continue to get worse and in extreme cases possibly fail. In other words, it introduces a degree of danger that you really don’t want. Get it trued as soon as possible.
When you spun the wheel, how long did it spin for? Assuming the wheel was true and wasn’t slowed down by rubbing against brake pads, did it spin for just a few seconds or did you get bored waiting for it to stop? If the answer was closer to the first statement, then it is possible the bearings in the wheel hub need a service or at worst, replacing.

Tyres
Whilst spinning the wheels, have a good look at the condition of the tyres. Look out for worn areas, holes caused by small stones and cracks or splits in the sides of the tyre. Some tyres have small circular indentations that act as wear markers but otherwise determining at what stage a tyre needs replacing can be tricky. It depends on the tyres in question, on the riding you are doing and how deep the holes are etc. If the bike has not been used for a while and there are visible signs of deterioration in the tyre rubber (cracks, etc) then they should be replaced. If in doubt, change them or ask a mechanic or an experienced friend to take a look.
Valves
There are two types of valve. Presta and Schrader. Most road bikes have Presta as they have a smaller diameter, so require a smaller hole in the wheel rim and allow for greater pressure. Schrader valves are more common on mountain bikes and hybrids. Some pumps will have a reversible part in the nozzle attachment that allows you to pump up either. Be aware, you can have a pump specifically for Presta valves and it won’t work on all Presta valves. I have one valve where one of my pumps will work and another won’t. Don’t always assume it’s something you are doing wrong. Be aware that whilst tyres may be pumped up with a hand-held pump out on the road if necessary, it is a lot easier to use a track pump (floor standing pump) at home.
tyre Pressure
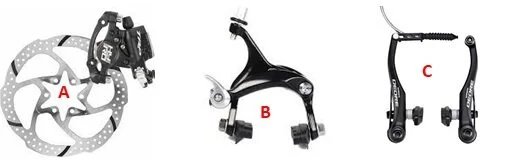
Tyres will sometimes have recommended tyre pressures on their side walls. As a general rule, road bike tyres (the thinnest tyres - C below) are ridden at between 80 and 120 psi. The softer the tyre the more comfortable the ride but the more chance of a puncture. Hybrid tyres (B below and the sort on most bikes with straight handlebars) are wider than road bike tyres and are usually inflated to around 40-70psi. Mountain bike tyres (A) can be run as low as 25 to 35 psi. When riding in the wet it is often advisable to slightly lower the pressure in your tyres to aid grip. This is intended as a guide only. However, there is an abundance of information available on the web.

Brakes
Obviously, having brakes helps! Having brakes that work well is even better. There are two basic types: ones that use brake pads rubbing against the wheel rims and ones that have a separate braking disc attached to the wheel. These are, unsurprisingly called disc brakes (!) and used to be only seen on mountain bikes but are now appearing on more and more road bikes.
Checking Rim Brakes (B & C)
Try squeezing the brake lever. How soon after you start to squeeze do the brake pads touch the rims of your wheels? It shouldn’t be instant but the longer it takes, the longer it will take to stop the bike. Looking at the brake pads in light of the note above, they will be too far away from rims if it took time for the squeeze to meet resistance. But also look for even wear. Most brake pads have grooves in them and if you can’t see these they have exhausted their useful life. If the brake pads are not worn, they may be badly positioned. When applied they should sit flat against the rim without touching the tyre itself and should be at same height as each other. If the bike is old it may also be that the calipers (the bits of metal that form the mechanical operation of the brake) may be dirty or, worse still, rusty which will make the brakes stick. Unfortunately there are too many varieties of brake to allow us to cover everything you need to adjust them in this one paragraph, but again if in doubt, call in an expert.
Checking Disc Brakes (A)
Disc brakes can either be controlled by cables (like rim brakes) or a hydraulic system. The former tend to be cheaper but can be prone to cable wear due to friction just like rim brakes. So if you test your cable disc brakes and experience anything other than a crisp return of the lever it’s time to get them checked. Hydraulic disc brakes have the advantage of being much more efficient - so much so that they actually multiply the force you apply when squeezing the brake lever - but need more professional experience to maintain them. If you test your hydraulic disc brakes and they feel ‘spongy’ - i.e. the lever needs a lot of squeezing to make the brake work then the system probably needs bleeding and it’s time to phone your local friendly mechanic! Disc brakes tend to have very small gaps between the brake pads and the discs attached to the wheel. This can mean that under some circumstances you’ll hear a slight intermittent ‘wooshing’ sound if the disc slightly deforms as it can after prolonged braking on a descent for example. Normally this is nothing to worry about and usually corrects itself after a relatively short while. This can happen on any type of bike but is particularly noticeable on road bikes where there is less ‘ambient’ noise to disguise it than on off-road machines. If you do experience this and are worried that the ‘brake rub’ may be impeding you perform the wheel spin check described above and if the wheel rotates freely then you can be assured all is well. If not, then your disc brakes will need some adjustment!
Lubing (Oiling) the chain
There are three basic choices. Lube, both wet and dry, and wax. Starting with lube. This is essentially a specific type of oil made for bike chains. Don’t be tempted to use another sort of generic oil - Non-specific WD40 or 3-in-one for example - as these will not be as effective. There are plenty of different brands to choose from but for this purpose we will just explain the basic difference between the two types:
Dry lube is great in dry conditions and will attract less dirt to your chain. Unfortunately, it washes off in rain. Wet lube is effective in the rain for a lot longer but does pick up more dirt and so requires more regular cleaning. Cleaning your chain is important. If you have a problem - like a dropped chain - where the chain comes off the front cogs or rings - it will make the business of handling it somewhat more pleasant and less grubby. A clean chain also extends the life of all the elements of your ‘drive train’ - not just the chain itself but also the front cogs (chain rings) and rear cogs (cassette). A good lube is a lot cheaper than a new chain set (chain rings and cranks to which the pedals attach - which are always sold together and are therefore expensive bits to replace!)
When using a lube/oil (either wet or dry), dribble it on to the chain whilst rotating it with the pedal. Once you have completed a few circuits set aside the lube and run the chain up and down the cassette to spread the oil and then wait a while (ideally as long as you can - and an hour is not unreasonable) before using a cloth to remove the excess. This last bit is very important - even if you do it straight after applying the lube - as too much lube residue will attract dirt particles which will wear your chain and shorten its life. It is better to repeat the process regularly every week or so, than soak the chain once every two months.
You will also most likely want to buy a chain cleaning product to help you remove old lube every once in a while when you clean your bike. Again, there are many different makes you can choose from, but we would advise buying one that is eco-friendly and water washable.

The third type of chain lubrication is wax. These usually come with their own solvent which you can use to clean the chain - although the biggest advantage of using wax is that it minimises the need to do this. Wax does not attract the same amount of dirt and grit that even dry lube attracts and therefore your chain, chain rings and cassette stay shiny and bright much longer! The solvent can also be used sparingly when applying the wax initially to ‘melt’ it a little so it better penetrates the chain. The downside is that chain wax is quite expensive compared to conventional lubes.
It is also worth mentioning that all new bikes should arrive with grease or a form of wax on their chains and you shouldn’t need to lube them for a couple of weeks or so. If you start hearing a squeak, then the chain needs lubing, so try to check it before you get to this point if you can. You should be able to feel the wax fairly easily. If you can’t then it’s time to start lubing!
One other tip on your chain is to check it every once in a while to see how much it has stretched. You can buy a simple tool for less than £2 which will help you do this. It simply fits in between the links of the chain and will tell you if your chain needs replacing. Replacing your chain will help save much more expensive components like your cassette from unnecessary wear.
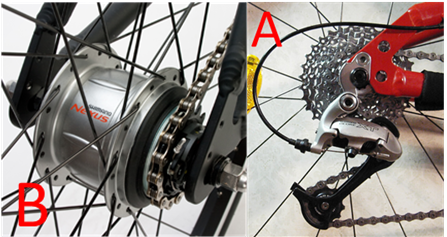
Gears
If you don’t know how many gears your bike has, how to use them properly and how to ensure they run smoothly, don’t worry — you’re not alone! For our purposes, all you need to check before going out on the road is: do your gears work. There are two main types of gears: Derailleur (A) found on all bikes and Hub (B above) usually found on sit-up-and beg, Dutch bikes, etc. If your gears are not working smoothly, then there can be far too many reasons to list here, so either Google the answer, call in a mechanic or let us know you need a blog on gears!*
Saddle height
We will deal with ‘Bike Fit’ (how to set your bike up so you are correctly positioned on it) in a later issue of this guide as it is the most important factor determining comfort when riding. Chief among the various ways in which your position can be affected is saddle height. As a general rule, most new riders have the seat too low. Possibly because it feels safer as your centre of gravity will be lower. The easiest way to check if your saddle is at roughly the right height is to sit on the bike with your heel in the middle of the pedal and with the pedal slightly forward from its bottom position (6 o’clock). Your leg should be completely straight, so that when you move the ball of your foot back on the pedal, there is a slight bend.
The most common issues cyclists report from poor bike fit are: pain in the knees – usually, but not exclusively, because their saddle is too low, or back pain - possibly because their saddle is too high. If you experience continued pain when cycling having made the basic saddle adjustment above, then you must get help with your bike fit. Cycling is not much fun if it hurts - and it really shouldn’t hurt!
All of the above is a distillation of some of the basic elements that we know some new cyclists find useful when first starting out but as we have said it is only a start and we can’t possibly include every single detail you might want to know. We hope, nevertheless, that it has been helpful but if you are in any doubt about anything we have said, or if you want further advice, feel free to contact us.
*If you’d like to know more about basic bike maintenance then CLICK HERE to sign up for our online sessions.