

WEEK THREE:
KIT - WHAT YOU NEED . . . AND WHAT IS NICE TO HAVE
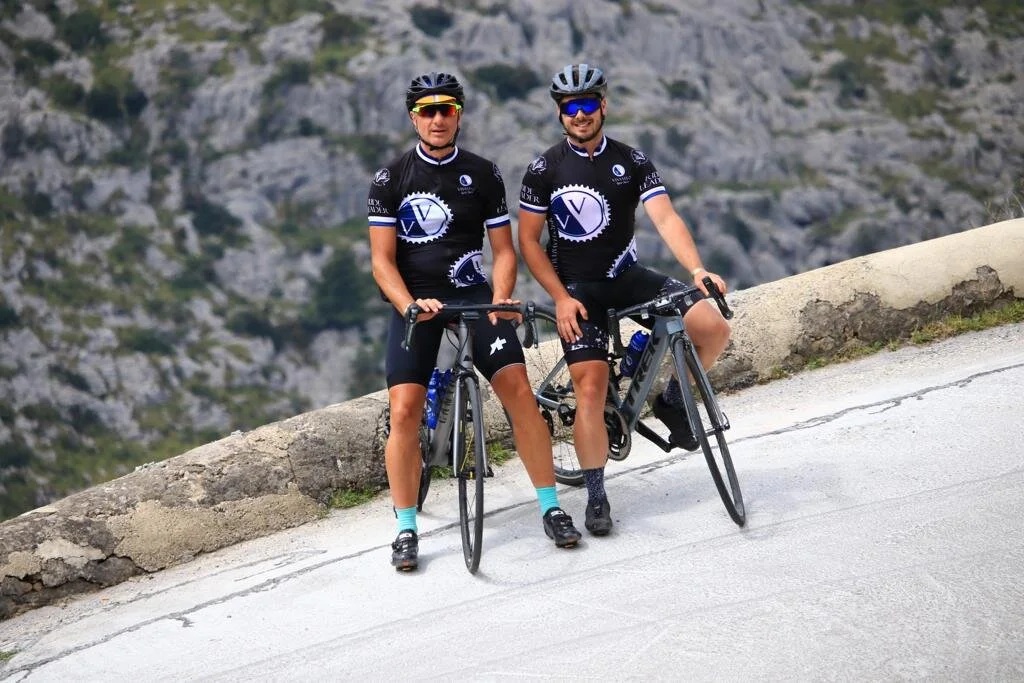
At Viva Velo we are experts in taking our clients on a journey from beginner to accomplished cyclist. Here is the third part of our Top Tips for New Cyclists Guide to get you cycling safely and enjoyably. This week we look at ‘kit’.
Whoever said cycling is a cheap sport probably never cycled but you can enjoy the pleasure of pedal power without getting a second mortgage. We could write a whole blog on the vast range of cycling technology available. There are a plethora of computers to track every calorie you burn and mile you pedal, cameras to record your rides and more apps and other online aids to training than you can shake a stick at. But in this week’s section of our Top Tips for New Cyclists we focus on what to wear on the bike as we believe being comfortable is as good a starting point as any. There will be plenty of time for you to invest in tech but our aim is to get you cycling enjoyably first! We will run through some ‘essential’ items that you should invest in as well as outlining some ‘nice to haves’ and the difference they’ll make to your cycling. We will also point out where to spend your money for the biggest bang for your buck and where not to waste it.
We have also included a section at the end giving details of some items you should always aim to carry with you when cycling. Essentially a little ‘tool kit’ that will get you out of trouble when out and about if necessary.
Having said all of that, the most important point we can make is that you don’t need any specialist clothing to ride a bike. Absolutely none. In fact, as the naked bike rides in various cities illustrate, you don’t need clothing at all! Although we obviously don’t recommend this approach – particularly not in the UK! The primary reason for specialist cycling clothing, as we have mentioned, is comfort. After that, we can talk about convenience and aerodynamics. How much comfort you require is determined largely by the length of your ride. A cheap pair of shorts might be fine for a couple of miles commute but if you are going to ride for ten, fifteen and twenty miles or more in one hit then you’ll soon find that they don’t really cut the mustard (just your backside!)
Let’s start at the top and work our way down.

WHICH HELMET?
We should state that it is not a legal requirement in this country to wear a helmet. There are arguments over whether to wear one or not, but we believe you should.

BRITISH STANDARD
Check for these logos somewhere on the packaging
You can spend a great deal of money on a helmet but you don’t need to. As long as a helmet satisfies The British Standards Institution (BSI) BS EN 1078 your head will be protected. Most helmets sold in the UK comply with this common standard and the symbols opposite should be identifiable somewhere on the packaging.
You should note that if you are unlucky enough to have an accident and fall and hit your helmet, then you should replace it immediately - even if there is no visible damage. At best the protective quality of the helmet will have been compromised and at worst, in the event of another accident the helmet could fail completely.
WHAT CLOTHING?
Before getting started on specific clothing it is worth noting a couple of general points
Because of your position on a bike - generally leaning forward and stretching your arms out - you need longer sleeves than normal and tops should be longer at the back than the front
The secret to what to wear on a bike is layering. Being able to remove layers as you warm up is extremely helpful.

THE BASICS
base Layer
Base layers are, as the name implies, the first layer of clothing worn next to the skin. The marketing of these will be all about their ‘wicking’ qualities. In other words, they are designed to take the sweat from your skin and transfer it to your jersey from where it can evaporate. Thus, even in the height of summer they can help regulate your body temperature. As in the picture above, these are often of a mesh construction. In the winter, there are thicker options, with merino wool being popular as whilst still ‘wicking’ it also retains some insulation properties when wet.
jersey
Jerseys will have a high, round-necked collar, full or half length zips, short or long sleeves and usually three pockets on the back. One pocket sometimes has a zip which can be helpful when carrying a wallet or phone. Jerseys can be short sleeved (for summer use) or long sleeved (for winter riding) and range tremendously in thickness. Different materials are sometimes used in their manufacture with some having mesh panels on the back or under the armpits to help with the evaporation of sweat and most are made of synthetic fibres which are more effective at ‘wicking’ sweat from the body. If the tops were cotton, they would largely hold the moisture and even if you were warm when riding, any breeze would soon cool you down too much when stationary. As mentioned before, the exception is merino wool (A) which works well in winter but is also comfortable in summer. It also has natural ability to slow the body odour forming bacteria from developing when you sweat. Synthetic fabrics are often treated with agents that slow the growth of bacteria, but these chemicals wear off after repeated washing.

As with all cycling kit, your objective when choosing a jersey should be to find something that is comfortable. Look for ones that will wick away sweat as this plays a huge role in how comfortable you’ll feel. Obviously, the more effective they are at this, generally the more expensive they will be. However, if like me you sweat a lot when you work hard, it can be impossible to tell whether the jersey is wet because it didn’t wick away effectively or because I was sweating too much for it to cope. There are also jerseys that are cut specifically to fit women (C) - definitely an aid to comfort! Jerseys range from loose fitting (D), sometimes called casual fit to ‘race’ fit which are like a second skin (B). The tighter the fit the more aerodynamic the jersey is likely to be be but if speed isn’t important looser fits are fine.
If you are very fair skinned or want to avoid too much exposure to UV rays then it’s also worth considering this when buying a jersey. Some top manufacturers will list the SPF rating (how much UV rays the material blocks) but not all. If in doubt, please remember, wearing a jersey is no guarantee that you’ll be protected from the sun.
shorts
When most people think of ‘cycling shorts’ they think of ‘lycra’ or ‘Spandex’ as the Americans call it. But you don’t have to wear skin-tight lycra. You could choose looser-fitting cycling shorts – or what the Australians call ‘Shy’ shorts (A). These usually have a baggy outer layer that looks like regular shorts with a padded lining like trimmed-down stretchy shorts, so they are still comfortable without being as revealing as the lycra variety. You can also buy padded ‘under shorts’ (B) to wear under normal everyday shorts or trousers (providing they are baggy enough!)
If you do opt for the lycra versions, you can choose between ‘bib’ (C) or ‘waist’ (D) shorts. The difference being that waist shorts have an elasticated waist and the bibs have integrated braces or straps which go over your shoulders and help keep the shorts in place. Both will have a pad known as a ‘chamois’ - which is what they were originally made from although all are now made from synthetic materials. This padding will protect your backside from chafing and is designed to be worn without underpants or knickers as these will potentially cause abrasion. The advantage of ‘waists’ is the ease of going to the loo, particularly for women. ‘Bibs’ tend to be more comfortable especially when leaning forward on the bike. No elastic to dig in and the straps keep them up at the back to avoid a draft. There are a couple of other terms you will come across on the higher end shorts like thermal and waterproof but their meaning is obvious. What is important is the fit, the pad and the stitching.

The Fit. Cycling shorts are designed to be tight. By using lycra, which has sufficient elasticity, they don’t move around and cause chafing. They are constructed from numerous panels for a better fit. Theoretically the more panels the better. A common mistake made by new cyclists is to buy shorts that are too big which allows them to move around and cause rubbing. It should take some effort to put them on, requiring you to pull the fabric over your thighs, possibly in increments. If the shorts slip on easily it is almost certain they are too big for you. The chamois should be comfortably in contact with your backside but bear in mind they are designed to be sat on, not for walking in. Don’t walk around shop thinking that is a good test of how they fit.
The Stitching. This is an area that can cause problems as stitching can rub. So a lot of shorts have flat stitching that is supposed to avoid this issue. However, from experience I would say it is more about the cut and fit than any stitching.
The Pad. This will absorb some of the road vibration and is designed to keep you comfortable on the saddle. Thus, in a sense, the further you are riding the thicker the pad required. Except, it isn’t that simple and to be truthful, buying shorts can be trial and error. We are all such different shapes that what will suit one person can be uncomfortable to the next person. Generally though, if you are going to spend money on kit, spend it on shorts. While there is no guarantee that an expensive pair will be the most comfortable, you can be virtually certain that if you intend riding for any distance over 10 miles in one hit, buying cheap shorts will almost certainly come back to bite you . . . in the backside!
Please bear in mind, all shorts can be uncomfortable to begin with. It does take time for your backside to get used to being on a saddle. So, if you’re thinking of doing your first long charity ride, don’t invest in a new pair of shorts the day before and then ride in them for the first time on the big day! Break them in like you would a pair of walking boots. One final point:
As a general rule, avoid white shorts. Not only do they show the dirt and stain more easily but they can become see-through when wet! Which brings us nicely onto our next section . . .

WHEN THE WEATHER ISN’T FAIR
Unless you are only going to cycle when the sun is shining - and let’s face it even in summer in the UK that is not always going to be possible - you’ll want to look at getting yourself some clothing to keep you dry and warm. Below we run through some of the options.
jacket
Buying a jacket usually involves something of a compromise. The warmer and drier they keep you the less they will breathe (wick). The more effective they are at wicking away, the more expensive they tend to be so deciding how much bad weather riding you are likely to do will obviously affect your choice. If you are going to be a fair-weather cyclist – and there is nothing wrong with that - then a relatively cheap lightweight waterproof will probably suffice. If you anticipate commuting in all weathers, then investing in something more substantial will be essential. Cycling jackets can be generally arranged into three types:
Waterproof (A) Fabrics are improving, and there is a wide choice. The more expensive the jacket, the more likely it is that a branded fabric like Gore-Tex will be used. These fabrics make the garment completely waterproof whilst still, in theory, allowing the moisture generated from sweat to escape. Most waterproof jackets will also be constructed with some vents designed so they let sweat out, but don't let water in. They're usually under the armpits or concealed under flaps round the body. Some manufacturers use DWR (durable water repellent) fabric which is a finish used in conjunction with waterproof membrane fabrics like Gore-Tex that encourages water to bead up and roll off, preventing the material from becoming saturated with water. Remember, for a jacket to be waterproof the seams must be taped to prevent leaks.
Windproof (B) If rain is not an issue then a windproof jacket is a good option. Windproof jackets tend to be lighter than waterproof jackets and are much more breathable. They are usually designed to have some water-resistant qualities but persistent rain will get through them.

Soft shell (C) Soft shells essentially combine an outer and mid-layer, providing insulation and keeping the elements out. They are softer and more flexible than hard shells so are more comfortable. You can wear one over a base layer and feel fine. The greatest appeal of a soft shell is that, unlike a hard shell, you can wear it most of the time, even when it's not raining. A soft shell isn’t waterproof, but it should be water resistant and much more breathable so it copes with a far wider range of typical British winter conditions.
As with jerseys there are those specifically made to fit women (D). Some general points on jackets:
Do ensure the arms are long enough and the back of the jacket comes down past your waist even when bent over handlebars.
That you can undo the zip even with gloves on and that there is a flap over the zip to prevent the wind and rain coming in.
Not all jackets have pockets. Think about how important it will be to you to have easy access to food or your phone etc.
Bear in mind the number of layers you will be wearing underneath the jacket as it will affect size required.
Avoid jackets that are too baggy at the back. They fill with air as you ride and act like parachutes. Not pleasant when riding into a headwind!

GILETS
A great piece of kit and essential part of your layering system. Essentially a sleeveless lightweight layer, gilets are the back-up ‘Goldilocks’ garment for days when a jacket might be too warm but a jersey not warm enough. Of course, the manufacturers complicate things by making so many varieties. Windproof, waterproof and thermal being just some examples. Hopefully, our explanation of the types of jacket will help solve which gilet to buy. You can even buy some lightweight shower-proof jackets with arms that can be detached to create a gilet – a great option if you want to kill two birds with one stone!
Arm, knee and leg warmers
'Warmers’ are a very cycling specific bit of kit. They are essentially bits of fabric – usually lycra or a mix of other synthetics which, as their name implies, cover your arms (B), knees (C) and legs (A) respectively like a sleeve or leg of a pair of tights but without the material joining them together. A bit like a gilet, the advantage of ‘warmers’ – particularly the knee and arm versions - is unlike a full layer, e.g. a jacket or tights, they can be removed and rolled up and easily fitted in a pocket. They allow you more flexible options should the weather be changeable or should you need to remove layers as you warm up or add them if you cool down. They are also worth considering in the summer if you burn easily. Look for an SPF rating. One of our ride leaders usually only ever wears leg warmers as an adjunct to his summer kit. In terms of their flexibility and ease of use, ‘warmers’ are probably a purchase you should consider buying as a priority.

Gloves
In summer you may choose to wear fingerless gloves – sometimes known as ‘mitts’ (B). These vary hugely but are primarily to help protect your hands rather than keep them warm. Some have gel pads under the palms to help absorb some of the vibration from the handlebars, others have an absorbent strip on the back or thumb to wipe your forehead or nose, others leather patches on the palms to protect them if you are unfortunate enough to fall off. The materials used will vary as will quality but it’s not something you have to throw a lot of cash at. Some of our ride leaders don’t wear mitts at all. Largely through vanity as the white outline of them on an otherwise tanned hand can look a bit weird!
For Winter. While mitts offer you some protection from vibration and pressure when riding in the summer, in winter, gloves become an essential. And it is not just a question of comfort. Gripping handlebars, braking and changing gear can be almost impossible with hands that have lost all feeling! Unfortunately, there is no perfect solution to keeping your hands warm on a bike when the temperature drops. Thick gloves may be warmer but you still have to be able to brake and change gear. Similarly, the better the insulation, the hotter your hands will become when making an effort. One can soon find your hands are soaking wet. To make matters worse, when you remove the gloves you can find the inner layer is only stitched to the outer layer at the cuff which means when you pull your hand out the whole inner comes with it and can be a nightmare to get back in.

So that’s the bad news. The good news is there are all sorts of options available from neoprene gloves (A) to warm and windproof (C). Think about the type of riding you are going to be doing. A pootle to work on a very cold day demands a glove with greater insulation. If you are going to be working hard, wear a pair with less insulation and allow your hands to warm up as you work. If it’s raining, a waterproof glove will be better obviously. But if it’s raining and you are going to be working hard make it water resistant. As with jackets, the more waterproof a glove is, the less it will breathe and the wetter it will become inside as you sweat.
As you can see, there is no one option to suit everyone and it is a matter of trial and error. That said, it can be miserable to have cold hands on the bike so this is one area you might like to spend more of your hard-earned cash on. A few other tips:
Make sure the gloves you buy have sufficient cuff to ensure there is no gap between glove and sleeve.
If you have touch screen devices select gloves that will work with them rather than having to take your glove off.
It can help to carry a spare pair of gloves in the winter or a pair of thin inner gloves that you can use under your normal gloves to provide an extra layer when it is very cold.

The Snood or Neck Scarf
This is arguably the best piece of kit you can have when cycling in winter. It keeps your neck warm and can be pulled up under your helmet to cover your ears too. Enough said.
Tights
When the weather turns cold you will want to cover more of your legs and particularly protect your knees which do not like cold weather. As the old cyclist’s adage goes “ If it’s less than 16 degrees, cover the knees!” Cycling tights extend the coverage to your calves or to your ankles and are usually made of a thicker material to keep you warm. Like shorts, they’re available with and without bibs, and with or without a chamois. Those without are worn over a pair of padded shorts and mean you can get more than one use from them in between washes. Again, there are thermal and windproof options.
Another option is cycling trousers or jeans. These are usually made from fabric with a bit of stretch to make it easy to pedal in them, and have reflective patches inside the cuffs that are visible when you turn them up, a pocket for a small D-lock, buttons or pop studs to keep the bottom of the trouser leg out of your chain. They are also designed for cycling, with seams placed away from the centre line on the backside to avoid saddle pressure.

AND FINALLY - LOOKING AFTER WHAT YOU PEDAL WITH
shoes
You may start cycling with flat pedals and have no desire to ’clip’ in - and that is absolutely fine. If this is the case, you don’t need specific shoes for cycling, although shoes with stiff soles are best. However, if you are ready to clip in or are thinking about it, there are a few options which we will now discuss.
It might be good just to explain the advantage of using a dedicated cycling shoe and ‘clipping in’ before we go on. There are two primary reasons. The first is that it’s far more comfortable. When you try to increase your speed on a road bike using flat pedals your feet will slip around, meaning you have to reposition them every now and then. Secondly, if your feet are attached to the pedals, they stay put, which helps with pedalling efficiency and therefore less tiring because you won’t just be pushing down on the pedals but also pulling up. Furthermore, and we will deal with this in more depth on a subsequent blog, a rider wearing cleated shoes will typically pedal at between 80 and 100 revolutions a minute (RPM). Try doing that whilst keeping your feet on flat pedals!
Stiff soles are the main feature of cycling shoes, usually with attachment points for ‘cleats’ that clip into special pedals. The shoes should fit snugly and be held in place with Velcro or ratchet straps or occasionally old-fashioned laces.

Road-style shoes have a plastic cleat (B & C above) that stands proud of the sole and so are awkward to walk in and wear down quite quickly unless you wear rubber cleat covers when not on your bike. Shoes with recessed cleats (A above), originally developed for mountain biking, are easier to walk in which makes them great for commuting, touring and more casual riding. If you are new to riding ‘clipped in’ we would suggest you start using this sort of shoe and cleat. You can actually buy pedals which are flat on one side and have an option to clip in on the other. This is a great way to start cycling with cleats as it means you can practice where the roads are quieter and you feel more confident while still being able to pedal if you are not clipped in.
There is a huge range of cycling shoes on offer. One of the main reasons for price variation is weight and the stiffness of the sole. The lighter the shoe the more expensive it will tend to be. So, at the higher end you will expect to see carbon soled road bike shoes (B above) but other softer versions exist, similar to a robust walking shoe or trainer (A above). These are primarily intended for mountain bikes but which can also be used as a more comfortable option for road bikes and are available at a much more reasonable price. Most people will want whichever ones fit best. Simple as that. If you start competing in races, well then you might want to be shaving the weight off your kit any way you can but until then it should be all about comfort. Having selected shoes, and assuming you would like to ‘clip in’ to your pedals, then selecting which clipping in system (the combination of cleat and pedal) is the next task.

Clipless Pedals / Cleats
Whichever system you select, the principle is the same, for almost all road clipless pedals you place the cleat on the pedal with your foot and press down till you hear or feel it click in to place. You then rotate the foot away from the bike to release. Ask five different cyclists which system to go for and you are unlikely to get a consensus.
There are three primary choices, Look (the inventors of the clipless pedal, illustrated in C above) which are almost identical to the second option; Shimano SPD (A above), and third, to confuse matters, ‘mountain bike’ or ‘MTB’ cleats (B above) which are also referred to as SPD.
Oh, in case you’ve spotted the contradiction, they are called clipless because this system replaced the toe clips (those old fashion cages with buckles you might have seen) used prior to Look’s invention.
The fourth option, Speedplay, look nothing like the rest because of the ‘lollipop’ shape of the pedals, the cleat is rectangle with a circle cut out of it for the pedal body and axle but these are expensive and we wouldn’t recommend them for beginners.
Before finishing our section on cleats, one other thing to know is that the cleat can move around in the pedal to a degree. This is known as float. The different cleat options offer different degrees of float. Shimano and LOOK both offer three different versions of their cleats with three different levels of float. Both companies colour code their cleats, making it easy to determine which is which.
Cleat setup, that is the position of the cleat attached to the underside of the shoe, is a personal thing that takes time to get right. There are lots of tutorials on-line on how to set them up but you might still find yourself making adjustments several times before you are happy. For those of you intending to extend the distance you cycle beyond 20 miles at one time cleat position is very important if you want to avoid knee pain. The smallest variation can make a huge difference. So if you can’t get it right after making adjustments yourself, it would be wise to seek expert advice from a professional bike fitter.
One final element of footwear is shoe covers. Cycling shoes are not designed to keep your feet warm and dry and some sort of cover is essential in the winter and/or in the rain. You get some that are just toe covers and others that cover the entire shoe and come up to your ankles. Partly personal preference and partly weather will dictate which you go for. The all over ones have a hole on the underside to allow you to still clip in. consequently, very few are really waterproof, but they can make a huge difference to your comfort on the bike when the weather is less than ideal.

other kit
Eye-wear - and it isn’t just sunglasses!
Most of you will have noticed that sunglasses seem to be standard issue for professional cyclists and doubtless the big manufacturers are keen they wear their particular brand! But cycling eye-wear is not just a fashion statement and is about much more than shielding your eyes from the UV rays of the sun - important though that is. Stopping grit, splashes from the bike in front and insects, etc is essential if you don’t want to get home at the end of a ride with sore eyes. Even if you are commuting in winter on the dullest of grey days in the UK, we therefore advise you wear some form of eye-wear, possibly with a clear or ‘light-enhancing’ lens instead of the conventional anti-UV one. Many cycling specific glasses come with a selection of different lenses which you can then change according to conditions. If you wear normal glasses to help your vision it is possible to buy cycling specific prescription eye wear, although it is expensive. Alternatively you can buy cycling eye-wear that incorporates a separate inner prescription pair that clip into the outer frame or if you only need reading glasses and need to be able to see things at close range (bike computer, phone etc) you can buy little plastic half-moon inserts to a given prescription which adhere to the inside of your conventional cycling eye-wear. When considering how much to spend on glasses, consider how likely you are to drop them!

What to carry with you - guide to the basics
As we said at the beginning we have focused primarily on clothing in this blog but it is also useful to know what other things you’ll find it is invaluable to take with you on your ride or commute. We have divided them into essentials and ‘nice to haves’.
Essentials - never leave home without the following:
Pump (A above) - these are small and can be either carried on the bike clipped into a specially designed frame attached to the bike or in a back pocket. A good pump is worth spending some money on as you’ll soon realise when mending a puncture on a rainy day. Getting your tyre back to a pressure that you can ride on as quickly as possible is a boon and if you’ve bought a pump that leaves your tyre still depressingly flaccid and you gasping for air after five minutes of vigorous arm-action then you’ll probably not be best pleased! You can also buy CO2 gas cylinders (C above) and dispensers which are very compact and take the effort out of reinflating your tyre. But, there can be a knack to using them and one canister doesn’t fill much more than a tyre, It should be noted that all inner tubes will lose pressure and therefore need regular ‘tops ups’ before you ride. We’d advise buying a larger ‘track pump’ (B above) foe home use. They are infinitely easier to use to get proper pressure in tyres.
Spare inner tube (D above) - at least one. It doesn’t really matter how far you cycle if you get a puncture and can’t repair it/replace your inner tube you are probably going to be walking.
Tyre levers (B below) - obvious really. You can’t use your lovely new inner tube to replace a punctured one without taking the tyre off.
Multi-tool (C below) - this is a small tool which, as its name implies has most items you’ll need for minor roadside repairs, some even come with tyre levers attached. This little tool will help you make small adjustments to your bike on the road - maybe if your saddle has slipped for example. As you get more experienced at basic bike maintenance you’ll also learn how to fix small issues - for example with your gears or brakes perhaps - roadside.
Hydration – always carry a water bottle. You should also ensure you have some nutrition with you if you are cycling more than 5 miles.

Nice to Haves - useful things that’ll make your life easier
Patches (D above) - Small puncture repair kits about the size of a stamp and the thickness of a ten pence piece can be bought very cheaply. It is a pain to try and find a hole in an inner tube but if your luck is out and you’ve used all your spare tubes this little bit of kit can be extremely useful.
Saddle bag (A above) - certainly not essential as most of the above items can be carried in the rear pockets of a jersey but if you want to ‘de-clutter’ your pockets than a small bag which attaches to the underside of your saddle at the rear of the bike can be very handy.
Cable ties - if a bolt or screw fails on your bike while you are out these little plastic ties can be an absolute God send to help you make a temporary repair to get you home.
Small piece of rubber - usually you can cut this out of an old tyre. It should be about 60 mm x 30 mm and can be used to ‘line’ the inside of a tyre which has acquired a hole or some other breach before you reinflate the inner tube. It will stop the inner tube protruding through the hole in the tyre (which makes the bike unrideable) and should get you home with a bit of luck. If you use gels for nutrition an old gel wrapper can also serve the same purpose.
Waterproof - in the UK or anywhere where the weather is changeable it is important you are prepared. Once wet you can get cold very quickly even in the height of summer so if in doubt take the waterproof out!
To be honest we could go on for ever with other tips on useful kit to carry but the above list should see you cope with most eventualities when you are out cycling. We would advise one other thing: practice changing an inner tube or patching a puncture a few times at home before having to do it on the side of the road. Cold, numb fingers doing this for the first time in a rain shower are not likely to get you up and running again quickly. There are plenty of online videos dealing with this and we will be running some free sessions online very soon to cover this and other basic bike maintenance. You can sign up to these HERE.
